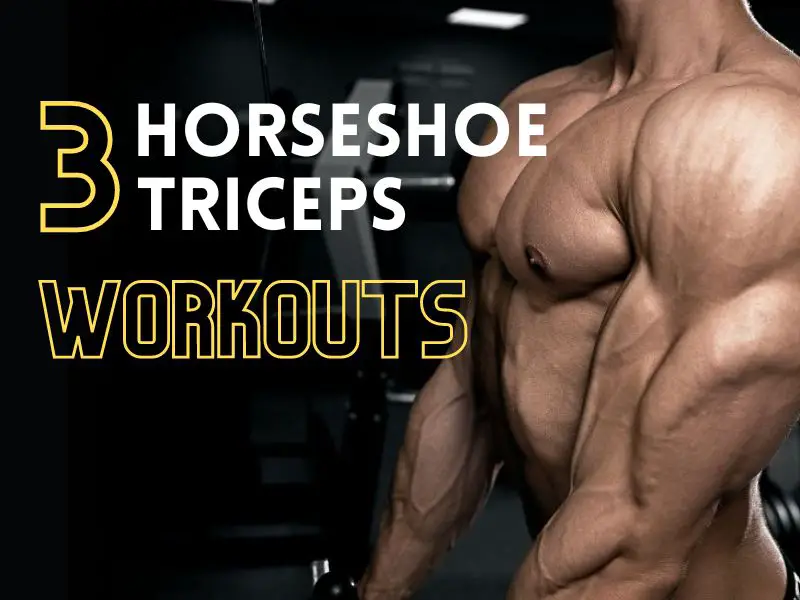
Are you looking for a way to get those triceps lines to pop? Are you tired of spending so many hours in the gym only to have little to no results?
Here’s the secret: To get that sculpted, well-defined look, you need to design and execute a solid horseshoe triceps workout that hits every part of that muscle.
I’ll discuss the 8 best exercises and 3 workout routines to help you get results asap. So read on, and let’s get you some well-deserved results now!
What Are The Horseshoe Triceps?
Let’s quickly talk about the basics, the anatomy.
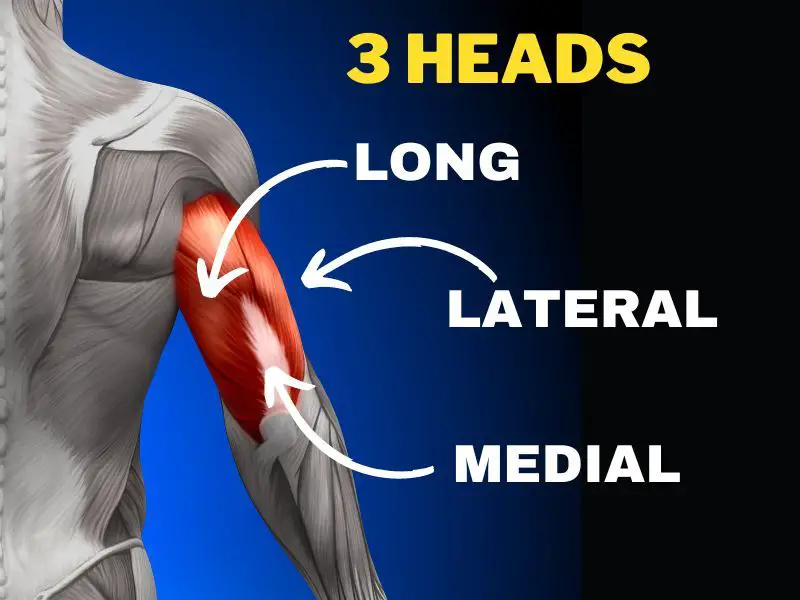
Triceps muscles that are well-developed are often called horseshoe triceps. Why? Because they look very similar in shape.
Triceps, as we know it, are actually the triceps brachii. This muscle has three heads located at the back of the upper arm. The main role of the triceps is to let the forearm extend from the elbow and makes you able to do pushing and pulling movements.
The three tricep heads each have a name: the lateral head, the medial head, and the third is the long head. These three together create the horseshoe shape when the muscle is toned, and this is what many people in the gym crave to have.
But before you go and spend countless hours building these tricep muscles in the gym, your body fat percentage has to be low enough for you to be able to see it. Here’s how you can know the difference.
With that said…if you want to develop it, you will have to make sure to target each head when you’re working out. If you do that, I promise that you will start to see results and begin to create that well-defined sexy horseshoe shape.
Now that you understand the basics let’s jump straight to the exercises and then the 3 workouts.
The 8 Best Horseshoe Triceps Exercises for Chiselled Arms
To get that sharp horseshoe triceps, you’ll need to work out all three heads of the triceps. These are the best exercises that you’ll want to include.
1. The Close-Grip Bench Press
This is a compound exercise that targets the lateral and medial tricep heads. It will also work your chest and shoulder muscles. Grab a barbell with a narrow grip, and make sure to keep your elbows close to your body as you lower the bar to your chest and then push back up. That’s it; that’s the whole movement.
Here’s a video tutorial: CLOSE GRIP PRESS | Triceps | How-To Exercise Tutorial
2. (Weighted) Dips
The main muscles worked with this exercise are the lateral head of the triceps and also the chest and shoulders to a lesser degree. Start by using the parallel bars or a dip station, lower your body until your upper arms are parallel to the ground at a 90-degree angle, and then push yourself back up.
Try to keep your elbows in the same shoulder-width position during the whole movement. When using your body becomes easy, you can either slow down the movement or consider using weighted vests to make it more challenging.
Here’s a video tutorial: Are You Doing Dips Properly? (AVOID MISTAKES!)
3. Skull Crushers
This is a crazy good isolation exercise that targets the long head of the triceps. A well-developed long head is crucial for creating that coveted horseshoe shape. You start by lying on a bench, then in a narrow grip, hold a barbell (or an EZ-bar) above your chest.
Begin the movement by slowly lowering the bar towards your forehead, keeping your upper arms in a fixed position shoulder width, then extending your arms back to the starting position. I highly suggest starting with a low weight to get the hang of the movement first. It’s heavier/more difficult than you might think.
Here’s a video tutorial: How To Do Skull Crusher
4. Overhead Triceps Extension
When doing this exercise, you will also be targeting the long head of your triceps. Begin by holding a dumbbell (or EZ-bar) with both hands overhead, with your arms fully extended position. Start by slowly lowering the weight behind your head.
Make sure you keep your upper arms locked in that position. When you get to the down position, raise your arms back again to the starting position.
Here’s a video tutorial: How To PROPERLY Overhead Dumbbell Tricep Extension
5. Triceps Pushdown
When doing this isolation exercise, you’ll be working all three tricep heads. However, most emphasis will be on the lateral and medial heads. To do this exercise, use a cable machine with a straight or V-bar attachment.
Start by pushing the bar down slowly towards your thighs, keeping your elbows close to your body during the whole movement. When your arms are extended, squeeze the muscle and then slowly return back up. Both directions of the movement are important, so don’t quickly return the bar back up. Also, focus on that part of the movement to get the most out of it.
Here’s a video tutorial: How to do the CABLE TRICEP PUSHDOWN!
6. Diamond Push-Ups
One of my favorites. I love it because you only use your body weight and you don’t need any equipment to do it. You work all three parts of the triceps muscle, but you also work a bit on your chest and shoulder muscles. To do this exercise, get into a normal push-up position. Move your hands closer together until you form a “diamond shape”. Your thumbs should be touching each other and your index fingers as well.
Now it’s time for the push-up movement. Make sure you keep your elbows close to your body and do not let them move outwards. If this happens, you are doing it wrong. Keep your body straight like a plank as you go down.
Lower your chest to the floor, then push back up. If this is too difficult, you can move your hands slightly apart, or you can also opt to do partial push-ups. I prefer moving my hands slightly apart. This one is a killer exercise; looks easier than it is. Don’t know how to do push-ups yet? Learn how to do them here.
Here’s a video tutorial: Diamond Push-Ups Tutorial
7. Triceps Kickbacks
This exercise works on the lateral and medial heads. With one hand, grab the dumbbell, bend your body forward at your hips but keep your back straight.
Your upper arm should be parallel to the floor, and your elbow should be bent at a 90-degree angle. Use a flat bench to balance your body. Now extend your arm backward without moving the position of your upper arm. Straighten your elbow as much as you can and squeeze that muscle. You should feel it.
After you reach this position, slowly return your arm to the first position. Do the 8 or 10 reps you want with one arm and then switch arms and do the same. Make sure to get the same amount of reps. There you have it, that’s the exercise.
Here’s a video tutorial: How to Do Triceps Kick Backs
8. Reverse Grip Triceps Pushdown
This exercise is nothing more than the triceps pushdown but then with an underhand grip. Same movement, a different flavor, if you will. When you do this exercise, you’re focusing more on the medial head. The other two heads will also be engaged but much less.
For this exercise, you’ll need a cable machine with either a straight or rotation V-bar attachment. I would suggest the rotation V-bar as it is easier on your wrists. Hold the bar with a reverse, aka underhand grip. Start by pushing the bar down towards your upper thighs.
Keep your elbows close to your body, and try not to move your upper arms. After pushing the bar all the way down, squeeze the muscle for a sec and then slowly return back up to the starting position.
Here’s a video tutorial: How To Under Hand Tricep Pressdown
The 3 Horseshoe Triceps Workout Routine
These workout routines are designed to hit all the tricep heads. Each takes about 45 minutes to complete. Do it as described here, or switch it up and create your own workout. To get your results, just make sure the exercises you choose hit all three heads and are exercises you can somewhat enjoy doing.
How do you know which exercise targets which head? Read the exercises I list above this section; it’s mentioned there. The workouts here are different, but the warm-up and cool-down are the same.
Workout 1: The Horseshoe RanchTricep Workout
| Exercise | Sets | Reps | Rest Time |
| Triceps Pushdown | 3 | 8 – 10 | 90 sec |
| Skull Crushers | 3 | 8 – 10 | 90 sec |
| Diamond Push-Ups | 3 | 10 – 12 | 60 sec |
| Overhead Triceps Extension | 3 | 10 – 12 | 60 sec |
| Weighted Dips | 3 | 12 – 15 | 60 sec |
Workout 2: The High Horse Tricep Workout
The High Horse is a high-volume workout. The focus is on increasing the number of sets and reps to maximum muscle hypertrophy and endurance.
| Exercise | Sets | Reps | Rest Time |
| Close-Grip Bench Press | 4 | 10 – 12 | 90 sec |
| Weighted Dips | 4 | 10 – 12 | 90 sec |
| Skull Crushers | 4 | 12 – 15 | 60 sec |
| Overhead Triceps Extension | 4 | 12 – 15 | 60 sec |
| Reverse Grip Triceps Pushdown | 4 | 15 – 20 | 60 sec |
Workout 3: The Horseshoe Superman Superset Workout
The Horseshoe Superman Superset is all about supersets, as the name implies. It’s brutal and will require every piece of motivation and will to complete. These supersets combine two exercises back-to-back with very little rest. It’s designed to be an intense workout but also saves you time in the gym.
Important Note: When doing supersets, do one set of the first exercise, rest for about 15-30 seconds, then do one set of the second exercise. Rest for the time recommended e.g. 90 seconds, and then repeat the superset. Do all sets for each superset before you do the next superset.
| Superset | Exercise | Sets | Reps | Rest Time |
| 1 | Close-Grip Bench Press | 3 | 8 – 10 | 90 sec |
| Skull Crushers | 3 | 10 – 12 | 90 sec | |
| 2 | Weighted Dips | 3 | 8 – 10 | 90 sec |
| Overhead Triceps Extension | 3 | 10 – 12 | 90 sec | |
| 3 | Diamond Push-Ups | 3 | 12 – 15 | 90 sec |
| Triceps Pushdown | 3 | 10 – 12 | 90 sec |
Treadmill Warm-up
Walk 5 minutes on the treadmill. It should be light and easy. After this, do some stretching focusing on the tricep muscles but also stretching your shoulders and chest. This is because you will also be working them out, but then as secondary muscles.
Rest, Take a Breather
This is important. Take rest between sets; this will ensure that your body gets to recover before you do the next set again. As you get stronger, you can take breaks between each set. You will be surprised by how much this small change can increase the intensity…you’ll be blown away.
The Cooldown
When you’re done smashing the workout, take some time to stretch your tricep muscles, arms, shoulders, and chest. This will help a lot with your recovery. Maybe you also find stretching to be boring, but it has massive benefits… do not skip it!
Focus on Form
For each exercise, I want you to focus on your form. Your form is by far more important compared to how heavy the weight you chose is. It’s not only safer, but you will also get way more results that way. Next, focus on controlling the movement and doing the full range of motion. When you notice the weight becoming light without compromising form, then increase the weight a little bit.
Max 2 Times a Week
I suggest you do this workout max 2 times a week. Feel free to switch up the workout I showed you here and create your own workout. I can promise you one thing, if you really do it, you will start seeing results faster than you think. Remember, take enough days to recover between these sessions; they can be crazy intense. Not doing it will hinder your progress, so do the smart thing. Rest.
The Wrap-up
Building horseshoe triceps will take a lot of hard work, but it will be worth it. To get the coveted horseshoe look, you’ll need a workout that targets the entire tricep, all three heads.
Use the exercises and workouts I detailed in this article, and you will start seeing results in no time. If you have any questions, please leave them in the comment section below.
Now…go hit the gym with this new plan and get your worth!
Signing-off, Derek Marina.

- 3 Explosive Horseshoe Triceps Workouts That Actually Work! - April 18, 2023